
Before we start...
This chapter is all about how I solved it (so far) to be able to place all kinds of assets like 3D-meshes or self-growing fractal seeds on the terrain. I have to admit that this gave me a lot of headaches especially when it came to performance issues. Keep in mind that we create new chunks every time the player comes near the border of the chunk she/he is currently walking on. In fact, it obviously causes the more freeze the more objects one’s trying to place at runtime and needs some optimization.
The biggest issue is the following:
Computations run by default on the so-called MAIN THREAD. It is simply a queue of executions that are calculated one after another. E.g.
The code calculates Instantiations (spawning assets with the given parameters), which is quite heavy for the system to calculate. Let’s assume we do it for each vertex on a mesh with let’s say 10’000 vertices. Guess what… if you don’t have a very good machine it will struggle. This struggle is visible for the player as a freezing screen. Why?
Because the computer won’t render the next frame until all the needed calculations are done!

It’s like you are watching a movie with friends at your place. At the most thrilling scene you get thirsty and go to kitchen to get an ice-cold beer. You pause the video and continue playing it when you are done with getting it. The time in-between your friends just see the paused image. It was frozen (kind of). It ruined the tension and part of the experience for your friends. At least bring some drinks for your friends as well next time…
And the same counts for a video game. Freezing is simply annoying and kills the flow.
Multithreading
What Sebastian Lague did to work-around it when generating new terrain chunks on runtime is to use multithreading. In the following video he explains it at 2:42min.
It goes way too far into detail to explain threading at this point and I am not sure if I get every part of it good enough myself.
Basically, creating a new thread means, you create a new internal coordination branch that can process calculations. This makes it possible to run two processes at the same time. The main thread has not to wait until all the objects are instantiated and can already render the next frame while the placement process runs on the separate, second thread. Here's a definition in other words from tutorialspoint.com:
A thread is defined as the execution path of a program. Each thread defines a unique flow of control. If your application involves complicated and time consuming operations, then it is often helpful to set different execution paths or threads, with each thread performing a particular job.
For more deeper information about multithreading have a look at tutorialspoint-link from above. I also found this forum post where a guy came up with a really nice tool. The ThreadingHelper. I will leave this downloadable zip-version here in case the link will break in the future.
It is important to keep in mind that some processes like Object.Instantiate() or all things that are related to gameobjects like Gameobject.CreatePrimitiv so as Transform, aswell as void Start(), Update() and many others CANNOT BE CALLED OUTSIDE THE MAIN THREAD. This is also mentioned in episode 8 of Lague's tutorial series. You have to use abstract values for the parameters you want to change and apply the changes for example in the Update() function of your main thread.
Coroutines
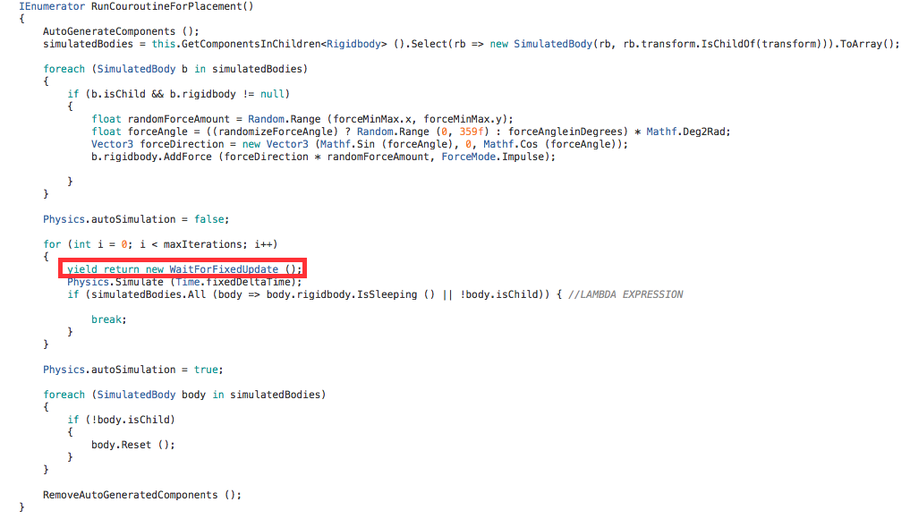
Another way of minimising lags is to use coroutines. Coroutines do not run on a separate thread, but they can give the main thread “time to breath”. Let’s say I call the method in the example below 50 times. Like I said, it would freeze cause the main-thread would calculate, and continue to render the next frame when it’s done. By yielding back “WaitForFixedUpdate()” it will stop at that point of the code, let the main-thread working on the rendering of the next frame, and then get back as fixedUpdate is reached to finish it’s task. This will not prevent freezing completely, but it can help to reduce it in my case!
Asset placement - depending on mesh height vertices
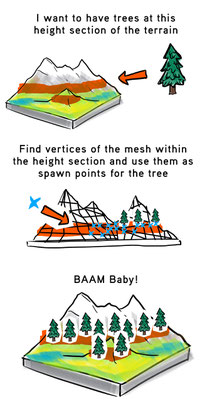
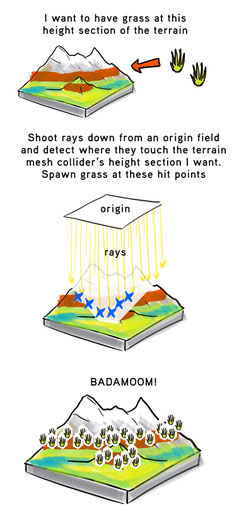
I showed you this picture last time, remember? Now this is what we will be implementing now. The key is to find all vertices of the terrain chunk’s mesh and evaluate their height. If we have found each single vertex at the specific height we then need to instantiate the asset at the vertex’s position vector.
So, first off let’s find the part of the script where the chunks are being generated. This is the place for getting the vertex and of course its position vector because here the LOD (Level of detail) mesh is being applied, so we can grab the information we need right at it's source.
It is found at:
TerrainChunk (script) public void UpdateTerrainChunk()
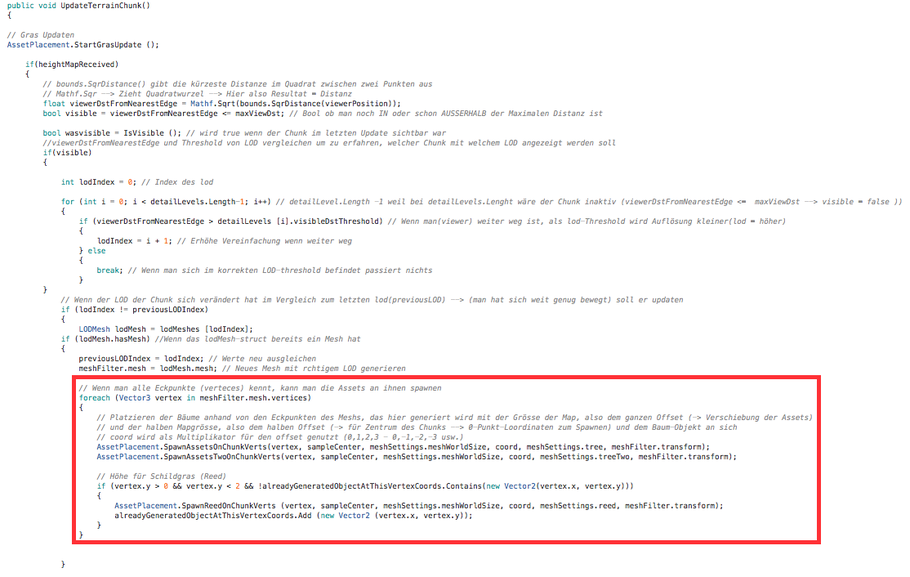
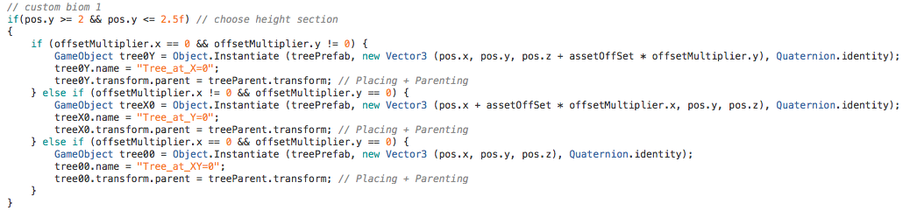
We could already place the if-statement here to choose a certain height, like in the last of the three calls. No idea why I did not do it instantly for all of them, but I guess It might been my intention to have one external script, the so-called AssetPlacement (script) to check all height conditions for all type of assets I wanted to include in the near future.
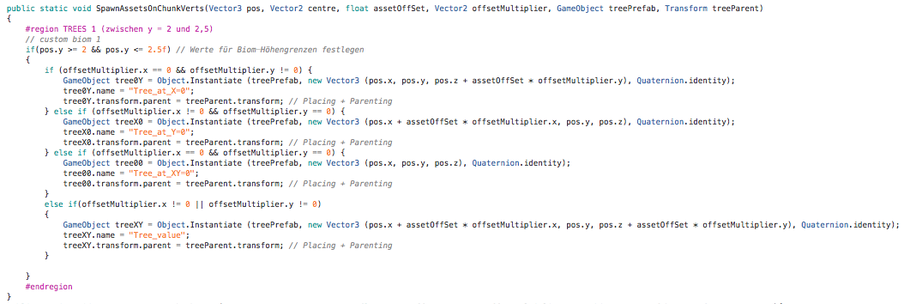
As you can see AssetPlacement.SpawnAssetsOnChunkVerts() takes in a bunch of parameters. Those are:
- vertex = the Vector3 vertex position (x, y (height), z)
- sampleCenter = the Vector2 coordinates of the chunk
- meshSettings.meshWorldSize = size of the chunk
- coord = this is a offset-value achieved by using the basic matrix of an cellular automaton grid
- meshSettings.tree = reference of the prefab of the asset we want to spawn
- meshFilter.transform = reference of the asset's parent (so it's only active in the scene when the chunk is)
I used the meshSettings reference because TerrainChunk is not a Monobehavior and can't access public gameObjects in the inspector. But TerrainChunk contains the MeshSettings class reference and can easily be accessed. A bit of a work around I have to admit.

Assuming the size of a terrain chunk is 200 x 200 units, the assetOffset of its centre is always minus or plus the amount of sizes to the left/right, up-, and downwards. This assetOffset is our sampleCentre parameter and it is translated into a value that tells us how many terrain chunk units we’re away from centre as well as in which direction. The so-called offsetMultiplier (the coord value) becomes important when we want to place objects on all terrain chunks and not only on one of them, because it means we can simply multiply the sampleOffset by the offsetMultiplier. The chunk in the middle is at 0;0. All others arrange according to the vector grid (x = width / y = height). So, it’s 0 x 200 on the x-axis and 0 x 200 on the y-axis. If the vertex position was something like Vector3(12, 2.3, 56) the asset will be instantiated at this Vector3 coordinate. When we check the chunk at 1;-1 we can simply add Vector3(12, 2.3, 56) + offset(sampleCentre) x multiplier(coord). Easy!
The AssetPlacement (script) contains the actual spawning of the asset on the chosen height of the mesh vertices.
grass placement - depending on raycasting hit points
Tutorial time again. I followed World of Zero’s tutorial on how to achieve this and added some lines of code to make it more flexible for my particular case. His series goes further but I needed to quit after part 3. I have absolute no clue what caused the issue, but I was not able to sum up the way to long and unclear arranged geometry calculation in the shader within a single function. He Sam Wronski does it in part 4 at the very beginning. Yes, I checked case sensitivity like 100 times… I thought it might be a bug that doesn’t support triStream.RestartStrip() ??
And unfortunately compute shaders are not supported on Apple machines… argh. Anyways… I found out I don’t know to code shaders with CG (Unity’s shader scripting language) and so until today I haven’t found a way to get shadows and other lighting stuff working on this shader. I posted my questions on some relevant helping platforms. But no success so far…
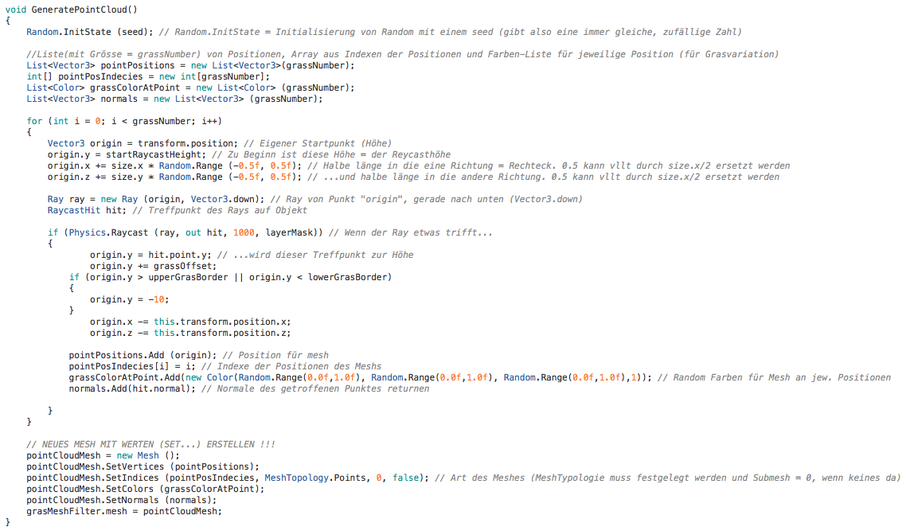
The most important scrip besides the shader itself is the GrassRenderer. I post a pic with some comments in german right here. But I suggest you, as always, to follow the YouTube series to get what it is all about.
The implementation for using this system on the terrain chunks that are generated is:
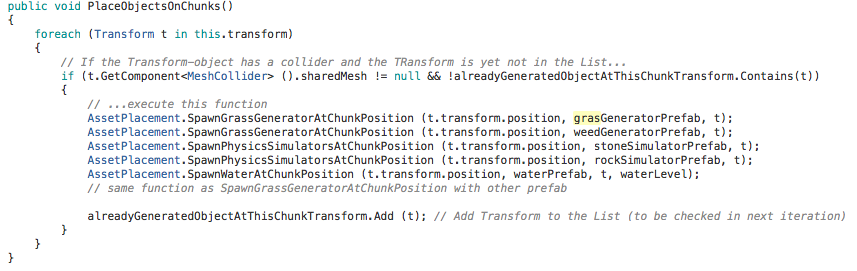
We only want the gras to be placed on chunks that have a collider attached to them. The reason is that raycasting works only on the collider and not the mesh itself! So therefor you can simply wait until all chunks are generated and then loop through them and check which do already have a collider attached. The code snipped above is then just used on these chunks. But what does it actually do?
It places the prefab, you learn to create in the tutorial series by World of Zero, over the chunks and raycast down on them to find the points for spawning grass on. Or... weed (lol). The same works (without the raycasting of course) also to place assets like water planes(Unity Environmental package) on the terrain. It's a bit easier as we don't need to find all the vertices to place the assets first.
Here you also see the alreadyGeneratedObjectAtThisChunkTransform.Add (t) which is a way of checking if the chunk that is processed already has this objects placed! Otherwise we instantiate every time we update the chunks also the assets again. We check it by using a HashSet.

When we use our placement method on this chunk, its Transform component gets added to the HashSet. Next time we check if the HashSet contains the Transform values for this chunk. If it does: skip it.
This is also used in other contexts. Basically whenever a "have-I-already-done-that-on-this-chunk?" question appears.
asset placement - depending on physics
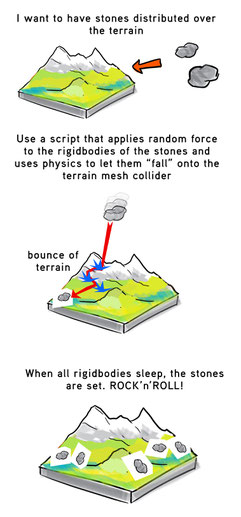
Last but not least: Physics.
By adding a Rigidbody and Collider component to assets like stones, while they are somewhere high over the terrain, we can let them fall down and make them act like “real” bodies on a terrain. There will tumble down, collisions will be calculated and as soon as the assets stays still on the ground – the rigidbody sleeps – the rigidbody and maybe also the collider becomes unnecessary and can be deleted. Safes us resources. By the way I think it makes sense to use BoxColliders instead of some complex MeshColliders. We are anyway running on the limit with calculating physics on runtime!
The thing with "maxIterations" somehow did not turn out to work properly when working with Coroutines! I used them for the reason of lag reducing I talked about earlier in this post. So, what I did: I made a separate script that destroys the asset if it falls through the terrain! AND THAT HAPPENS! BECAUSE OF REASONS!
Ya, I think it's phenomenon caused by a collision detection issue and known among the Unity community.
To achieve the promised stuff follow this great one by Sebastian Lague:
And this is my way of getting rid of the assets that fall through the terrain into eternity:
The BrokenAssetDestroyer (even if there's nothing broken on them)

The void Update() in the placement script

You already know how to instantiate this objects on the terrain chunks with that contain colliders already form the previous placement methods. But in addition you can for example spread the starting point for each asset a bit. This helps also to prevent that one asset falls on another if they don't have the same starting height! In my project this was the cause of weird flying stones! The upper stone fell onto the stone beneath it and as the rigidbody fell asleep, it got destroyed and the stone rested peacefully in heaven. Literally!
the example scene
That's an example of how the generation and placement of assets works hand in hand. Hope you could get the concept behind the methods and scripts I used. I'm looking forward to read some feedback!
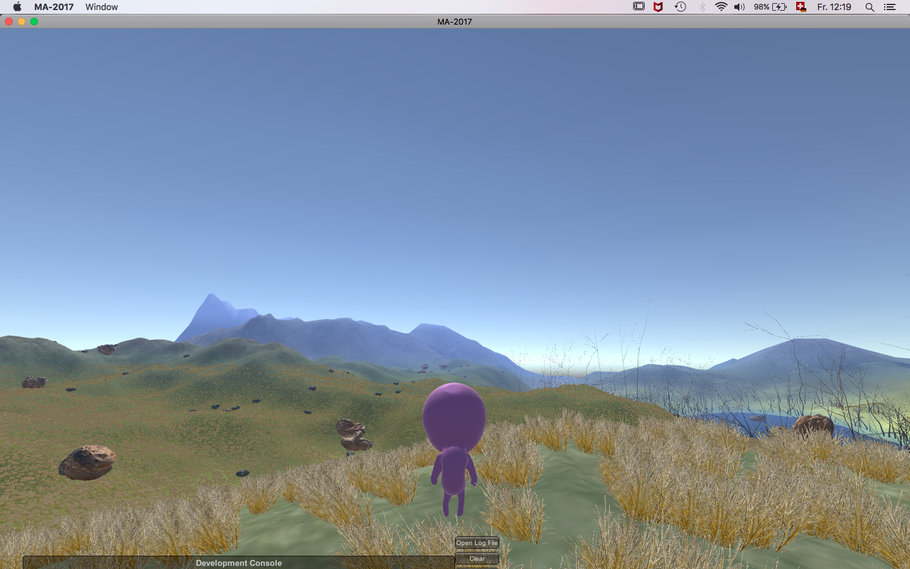
After tweaking around with the lacunarity and size values as well as adding fog through the built in Unity Lighting Settings --> you will find the Fog-tab, I made a fairly nice looking screenshot of the in game view. I know there's tons of improvements to work on, but for a first impression I'm kinda motivated to go on!
What's next ?
I will write about developing my first ideas for a story of the game prototype for sure. As I love drawing I will upload concept sketches and talk about some interesting tools I fount to elaborate new ways of getting interesting shapes out of the pen. More about special implementations in development and how much I hate shaders will follow! Stay tuned!
Write a comment
ElectorchStrauss (Saturday, 28 May 2022 01:32)
Hi does your AssetPlacement script inherits from MonoBehaviour?