
What kind of terrain do I want to create ?
I started the practical part by thinking of which technique would fit best in the end to allow the player to explore an endless generated world. I checked out some voxel based stuff and I knew from projects before (The PrättiApp) that it is fairly easy to generate a terrain by applying a heightmap on it. I decided against a voxel based system as I thought it would never be the case that the player manipulates the world’s terrain directly like in Minecraft of No Man’s Sky. But this means NO CAVES for the terrain and less interaction with it...
Voxels

In the examples above you can see how a player in minecraft is digging into the ground. This is achieved by destroying the cubes. Voxel terrains exist out of such individual pieces (in this case it is a cube, but it can also just be a vertex of a mesh like in the coming examples) that can be destroyed, replaced, or manipulated. Games like No Man's Sky use voxels to make mechanics like mining possible.


These examples show how smooth a voxel terrain can look in the end. For my understanding the shown examples look already a bit outdated, but from an developer's point of view I think it makes sense to show the base concept behind it.
The source for simple endless terrain
After plenty of research about endless terrains in Unity I found a promising tutorial series on YouTube about exactly what I wanted to achieve. The series is made by Sebastian Lague and whatever comes next would not be possible without his engagement in teaching and suppling up-to-date Unity tutorials. His explanations and code documentations are very clear and easy to understand. His code makes up the starting base for my terrain generator.
What Sebastian Lague teaches you:
- creating editable terrain (you can modify the height, structure, details of the structure, textures, colours, colours according to height)
- creating shaders for editable terrain textures and color overlays
- generating seamless new terrain chunks when the player (the green moving centre point) walks around
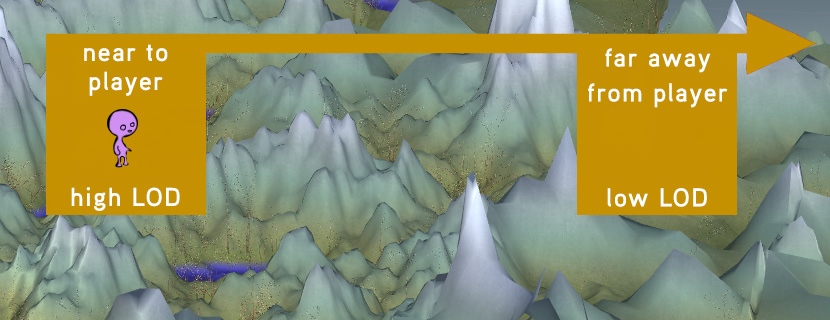
- implementing LODs (Level of detail). This is meant to reduce the details on terrain chunks that are far away and barely visible for the player to reduce computing resources needed
- create either islands or not falling-off terrains optional in a flatshaded style (ignore the trees, they are not part of it yet)
not flatshaded


flatshaded


What Sebastian Lague won’t cover (so far) – but I will:
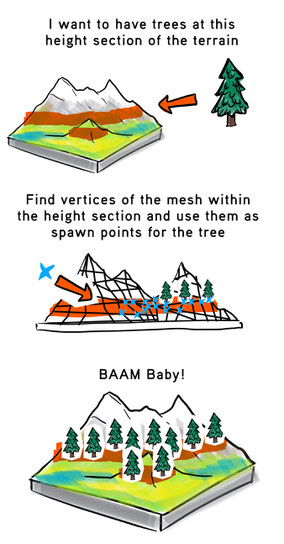
Object/asset placement on the terrain…
- …by spawning on vertices depending on height of the individual vertex
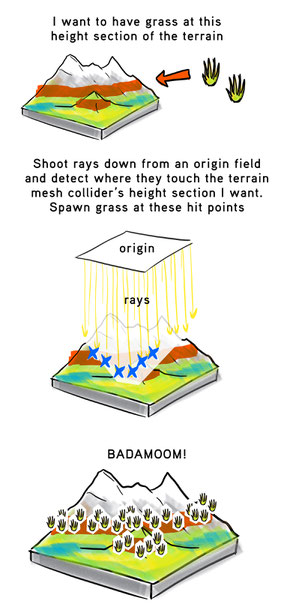
- …by spawning on raycast hit-points. Here I will use another tutorial by Sam Wronski, better known as World Of Zero on YouTube. I will cover it in a later post
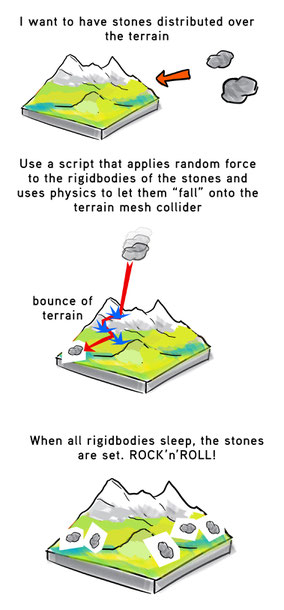
- …by placing the objects using a physics simulation (also developed by Sebastian Lague in another non related project but I extended the code to fit the needs of this particularuse case)
The essential tutorial by Sebastian Lague
I post the first video of the series right here, so you can find his YouTube-channel and get all the knowledge needed to continue later on:
And here you can find the whole terrain generator code on his GitHub (MIT license). I personally followed the tutorial step by step to understand what was happening in the various parts of scripts. This was, and still is essential to extend further functionality. Because his work was so much worth as a base to start with, I’ll also give you a link to his Patreon page. If in any chance you can support him, do it:
What's next ?
Next up I will start with implementing the functionalities I mentioned above that are not covered in the tutorial series so far. So keep on reading!
Write a comment